

AnkerMake’s latest 3D printer iteration is not only more affordable and quicker but also takes a different approach toward AI. Additionally, it boldly eliminates the traditional screen, a move that could attract a younger demographic.
Advantages:
- Speed
- Phone App
- Direct Drive
- Auto bed leveling
- PEI coated flexible build plate
Downsides:
- No SD card slots
- Noisy fans
- Proprietary nozzles
- Phone App
In 2022, Anker surprised the industry by introducing the impressively swift AnkerMake M5, a high-end 3D printer equipped with AI print monitoring. However, its spotlight was dimmed by the even faster Core XY from Bambu Lab. After making some adjustments, Anker has returned with the M5C: a swifter, more affordable, and user-friendlier 3D printer.
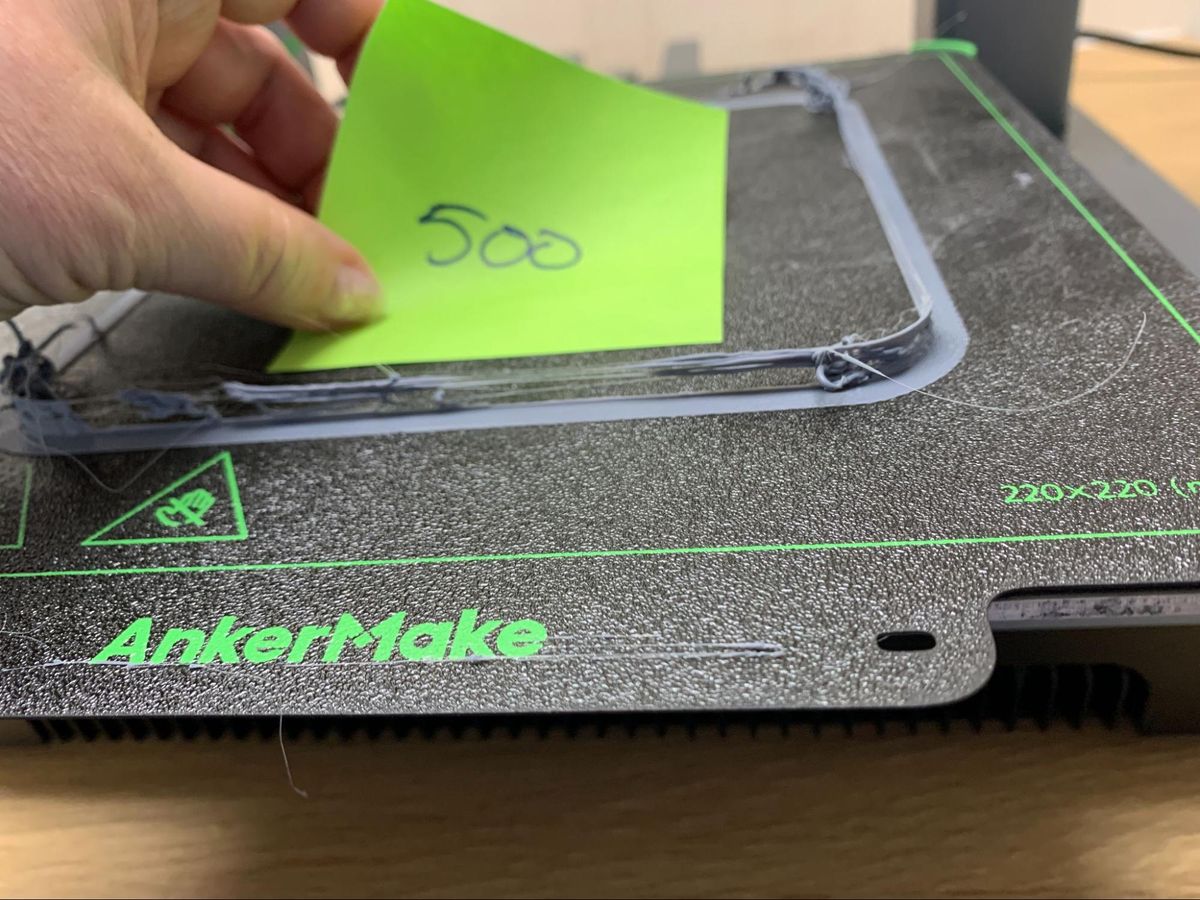
Priced at $399, the M5C boasts a top speed of 500 mm/s, featuring an all-metal hot end that can handle filament at temperatures as high as 300 degrees Celsius. It’s slightly more compact, sporting a build plate of 220 x 220, comparable to that of an Ender printer.
One notable omission is the absence of a screen. Anker has taken a rather intriguing step by completely removing any form of display from the M5C, opting instead for a prominent “play” button and reliance on a smartphone app. While 3D printer phone apps are not new, they typically serve as supplementary tools for print monitoring. However, AnkerMake’s phone app is mandatory and serves as the sole means of full printer control. This decision might raise concerns for some older users, while simultaneously appealing to those who have grown up surrounded by pocket-sized technology.
Anker’s marketing team is heavily emphasizing the printer’s appeal to newcomers through advertisements and several sponsored YouTube videos, highlighting the prominent singular “play” button. However, this might be somewhat misleading, given that Anker currently offers only 37 pre-made prints accessible for “play” through the app. For any other prints, users will still have to rely on a computer-based slicer. Since Anker doesn’t provide a USB-C stick for the printer, sending files via WiFi and bypassing the play button is more likely.
The AnkerMake slicer has undergone a thorough revamp and serves as the foundation for the printer’s user-friendly experience. Users are encouraged to stick with the Easy mode, which conceals the intricate slicer settings. During our testing, we predominantly used the Easy setting and found the presets to be highly dependable, covering a wide range of usable filament configurations.
However, there are some reservations about depending solely on a mobile app to control a 3D printer. The potential inconvenience of forgetting one’s phone when needing to change the filament, and the complexities associated with printer sharing, raise concerns. For instance, if multiple family members should be able to control the printer, they’ll need to download the app and create accounts – or utilize the owner’s phone. Yet, this could also be viewed as an advantage. In environments like schools, libraries, or maker spaces, only those with app access can fully operate the machine.
In summary, the AnkerMake M5C demonstrates impressive performance, offering both speed and user-friendliness, which positions it as one of the top 3D printers available.
Specifications: AnkerMake M5C
| Build Volume | 220 x 220 x 250 mm (8.6 x 8.6 x 9.8 inches) |
| Material | PLA/PETG/TPU (up to 300 degrees) |
| Extruder Type | Direct Drive |
| Nozzle | .4 high flow |
| Build Platform | PEI textured spring steel sheet, heated |
| Bed Leveling | Automatic |
| Filament Runout Sensor | Yes |
| Connectivity | WiFi, Bluetooth, USB-C |
| Interface | One Button |
| Machine Footprint | 466×374×480 mm (18.3 x 14.7 x 18.8in) |
| Machine Weight | 9.6 KG (21.1 lbs) |
Included in the box: AnkerMake M5C
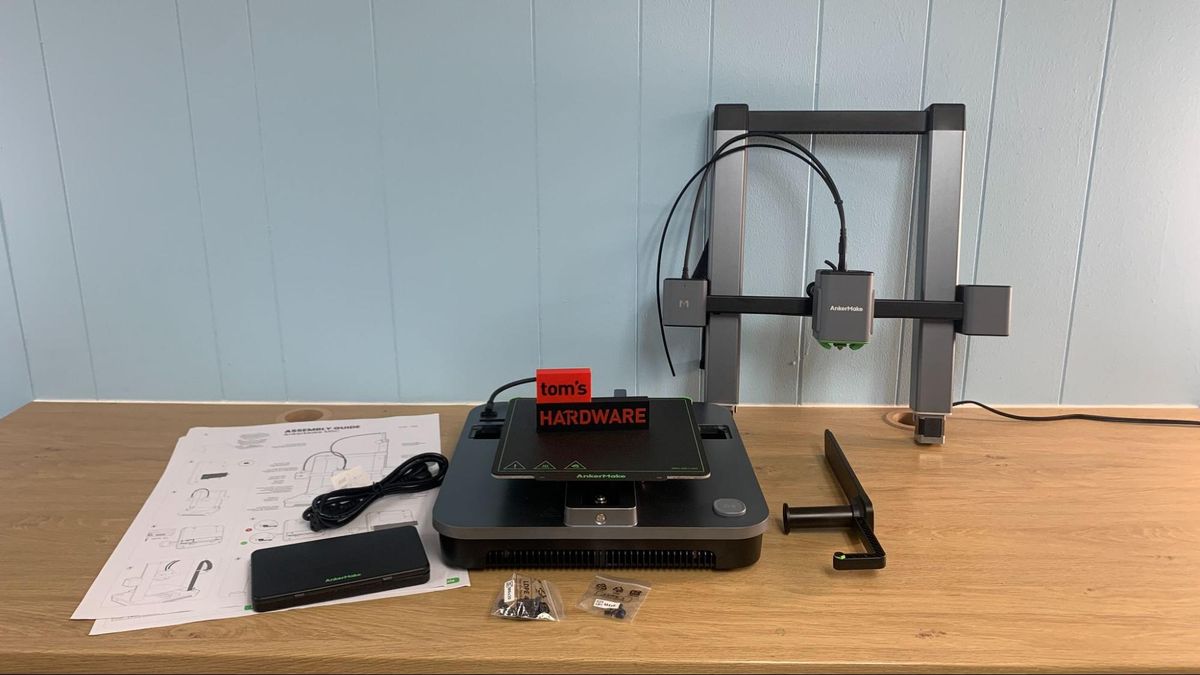
The AnkerMake M5C arrives equipped with all the necessary components to kickstart your printing journey. The kit includes a set of tools for both assembling and maintaining the printer, complete with a pair of side cutters. Additionally, a spare nozzle is included. Interestingly, a sample of filament for your initial print is notably absent, so it’s advisable to purchase some filament when placing your printer order. To aid in your selection, we maintain a compilation of the finest filaments for 3D printing.
A quickstart guide poster accompanies the package, offering guidance on building and configuring the printer. At the time of this publication, the AnkerMake app features 37 pre-sliced prints that can be accessed. To operate this printer, you’ll need to download the app.
Assembling the AnkerMake M5C
The AnkerMake M5C arrives in a predominantly pre-assembled state, requiring only 8 bolts – four for each side – to complete its assembly. I managed to put it together in approximately 20 minutes. The wiring process is simpler compared to most other printers, involving just two sets of wires for the stepper motors, along with a single appliance-style cord to connect to the tool head.
Leveling the AnkerMake M5C
The AnkerMake M5C features a pressure sensor mechanism that’s linked to the hot end, enabling automatic bed leveling. Personally, I find this to be my preferred method of bed leveling, as it involves physical contact with the surface and often results in an accurate Z height setting. In the case of this printer, I only had to adjust the z height when printing PETG.
The build platform is securely attached to the Y-Axis, and there are no manual knobs for tramming. All adjustments are carried out through the app.
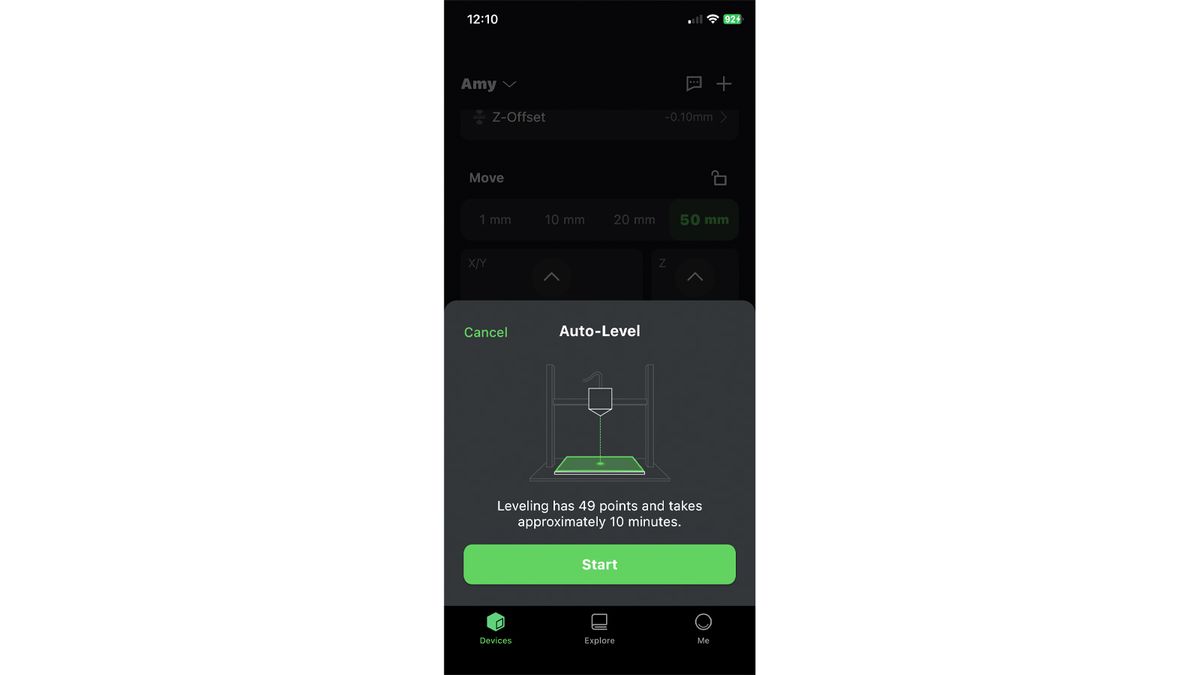
To level the bed, scroll down within the app until you locate the “Adjustments” section and then tap the “Auto Level” button. The app will provide an estimate that the leveling process will take around 10 minutes. Press the “Start” button to proceed, and the printer will begin heating up to 175 degrees on the nozzle and 60 degrees on the bed. Subsequently, it will home and gently tap 49 points in a 7×7 grid across the bed’s surface.
Loading Filament in the AnkerMake M5C
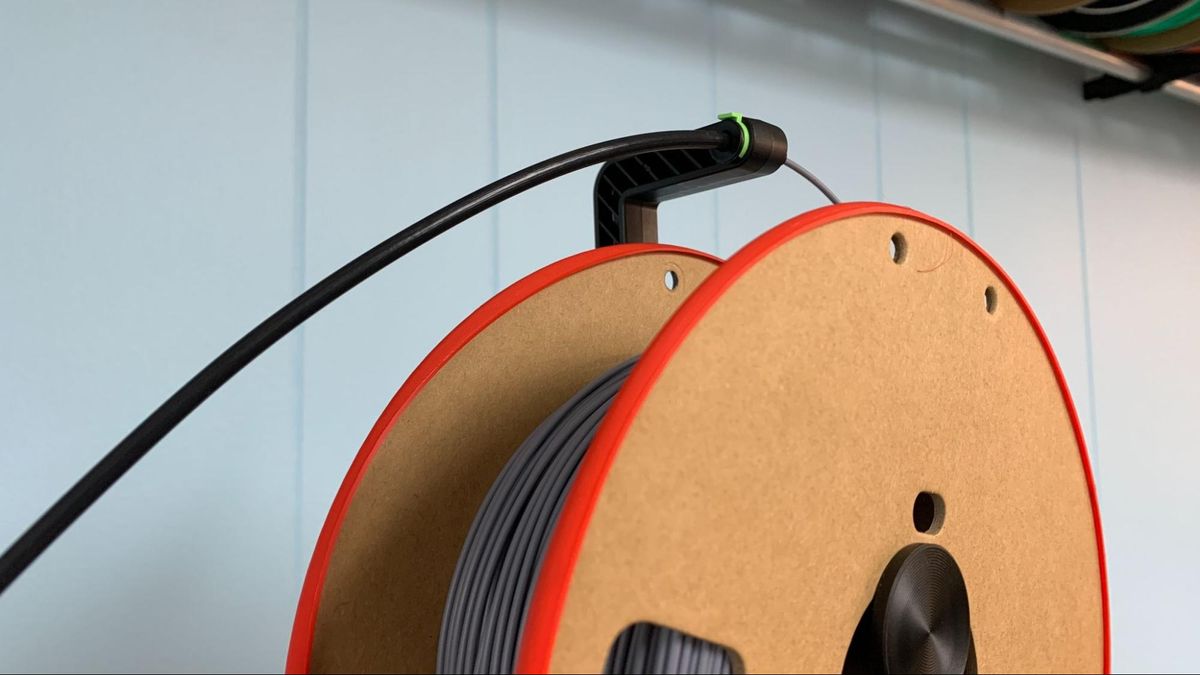
The AnkerMake M5C features an enhanced filament path incorporating a reverse Bowden tube that links to the spool holder. This setup facilitates convenient direct feeding into the extruder.
To load filament, simply tap the thermometer icon located next to the Print button within the app. Choose the filament type from the provided list, and the system will appropriately heat the nozzle and build plate. Gently insert the filament into the Bowden tube until you encounter resistance. Then, activate the lever on the tool head and push the filament a few additional millimeters. Next, click on the “Extrude” option from the main screen, prompting the filament to be fed into the hot end.
For removing filament or swapping colors, the process can be reversed.
Design of the AnkerMake M5C
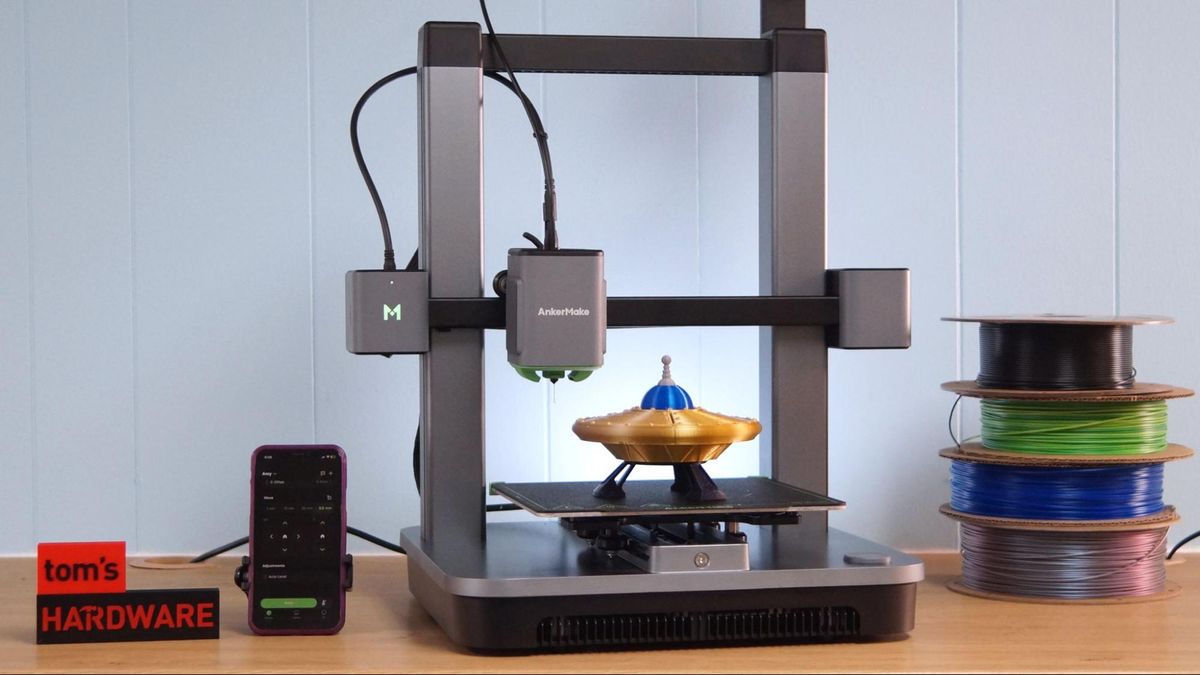
The AnkerMake M5C represents a more compact rendition of the AnkerMake M5, sporting a similarly sleek and contemporary appearance. The printer’s internal wiring and mechanics are thoughtfully concealed within its frame, with only a solitary exposed cable extending to the tool head.
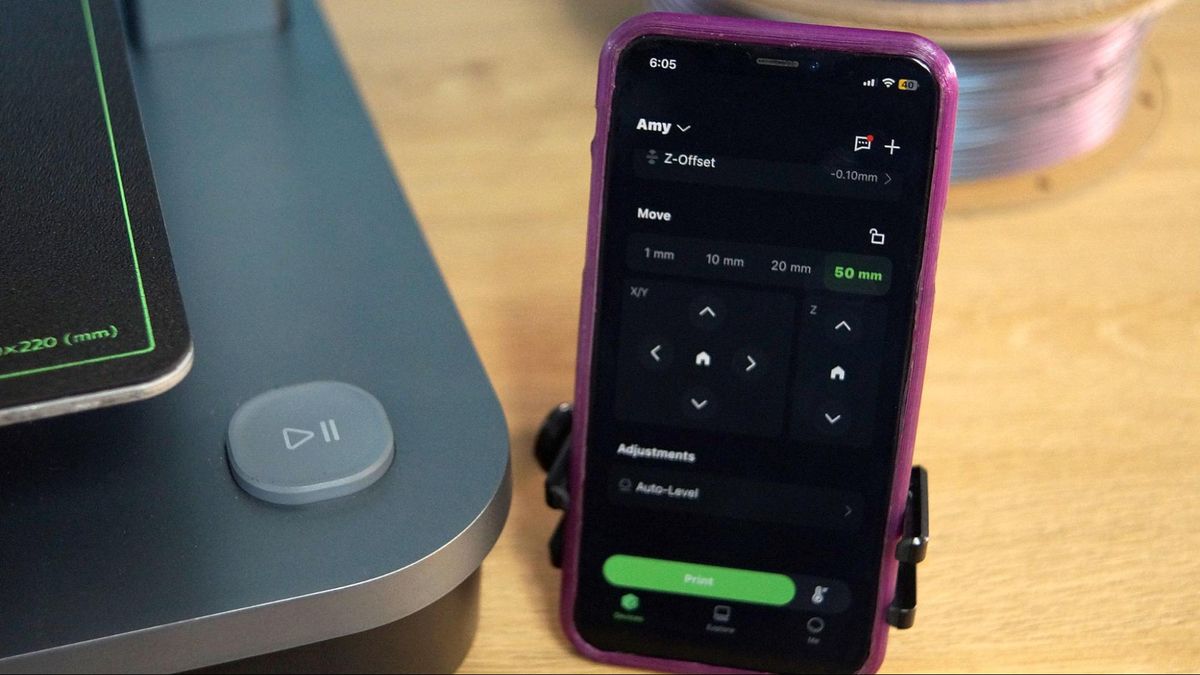
Remarkably, the printer lacks a physical screen or control panel, necessitating the use of either a mobile app or a computer for its operation. The most notable feature of the printer is the substantial play button situated on the front right corner of the base, accompanied by a luminous LED “M” on the gantry.
AnkerMake is placing significant emphasis on the “one-touch button” aspect of the M5C, although it tends to be more of a novelty rather than a groundbreaking innovation. This button can be programmed through the app and offers a limited range of functions. It can be configured for five actions: three when the printer is idle and two during printing. These actions are executed by a single tap, a double tap, or a press-and-hold for 3 seconds.
During idle mode, the button can be set to:
- Print the latest file on the USB-C drive
- Reprint the last file
- Auto-level
- Home all axis
- Do Nothing
While printing, the button can
- Pause/Continue
- Stop Printing
- Do Nothing
The button serves a practical purpose as an emergency stop or for pausing the printer during a filament change. However, due to the absence of a provided USB-C flash drive (an unusual format that I do not possess), I wasn’t able to test the function of “playing” a file from the memory stick. I did manage to utilize the button to reprint the last file, which proved somewhat helpful.
When sending a pre-sliced file through the mobile app, there’s no need to press the button – the app handles all the necessary actions. The same goes for sending files over WiFi from the AnkerMake slicer.
Given the strong emphasis on the mobile app, it would greatly benefit the AnkerMake M5C to include a camera. The previous M5 model had one, and it feels peculiar to visually confirm the print bed’s status manually, especially when the potential exists – theoretically – to initiate a print remotely from anywhere in the world.
Despite the camera’s absence, the app proves to be exceptionally practical. Whenever the printer encounters issues, it provides immediate alerts. For instance, when I tested the filament runout sensor, the app promptly notified me on my phone, indicating the need for more filament. I inadvertently unplugged the tool head without shutting off the power (to photograph the interior), leading to a significant error – the printer could no longer detect its temperature. The machine responded by alerting me with loud beeping, a warning through the app, and even an email notification, effectively highlighting this potentially risky situation.
The AnkerMake app hosts a growing collection of pre-sliced files, all designed to fit within the dimensions of the M5C while remaining compatible with the M5 model. At the time of this post, the app features 37 files primarily focused on small toys. While this selection falls short of the extensive ToyBox app library, the potential for expansion remains uncertain. As of now, there seems to be no way to contribute personal files to the library, although this might be possible with the use of a USB-C stick. Notably, the printer itself does not have any built-in file storage.
The AnkerMake app is also versatile, as it can be utilized with the older M5 model and can manage multiple printers simultaneously.
Despite being smaller than the M5 and lacking an AI-equipped camera, the M5C does not fall short as an inferior product. It features an improved all-metal hot end capable of reaching temperatures up to 300 degrees Celsius and boasts a higher flow rate (35mm³ compared to 24mm³). The filament runout sensor has been positioned on the tool head, minimizing inconvenience, and the Y belt is not tucked into a crevice where filament remnants might become entangled. Additionally, it produces a slightly quieter operation compared to the M5, although not as silent as slower printers.
The M5C delivers exceptional speed without requiring the added weight of its predecessor to maintain stability. An April firmware update for the M5 introduced Klipper’s Pressure Advance and Input Shaper, doubling the printer’s top speed to 500mm/s. These new limits come standard on the M5C, which is also more finely tuned and generates cleaner prints at high speeds.
AnkerMake adheres to its proprietary high-flow nozzle, available for purchase exclusively through their website. A set of 10 nozzles costs $20, which might be a touch steep for brass nozzles. However, various sizes ranging from 0.2mm to 0.8mm are available.
Preparing Files / Software
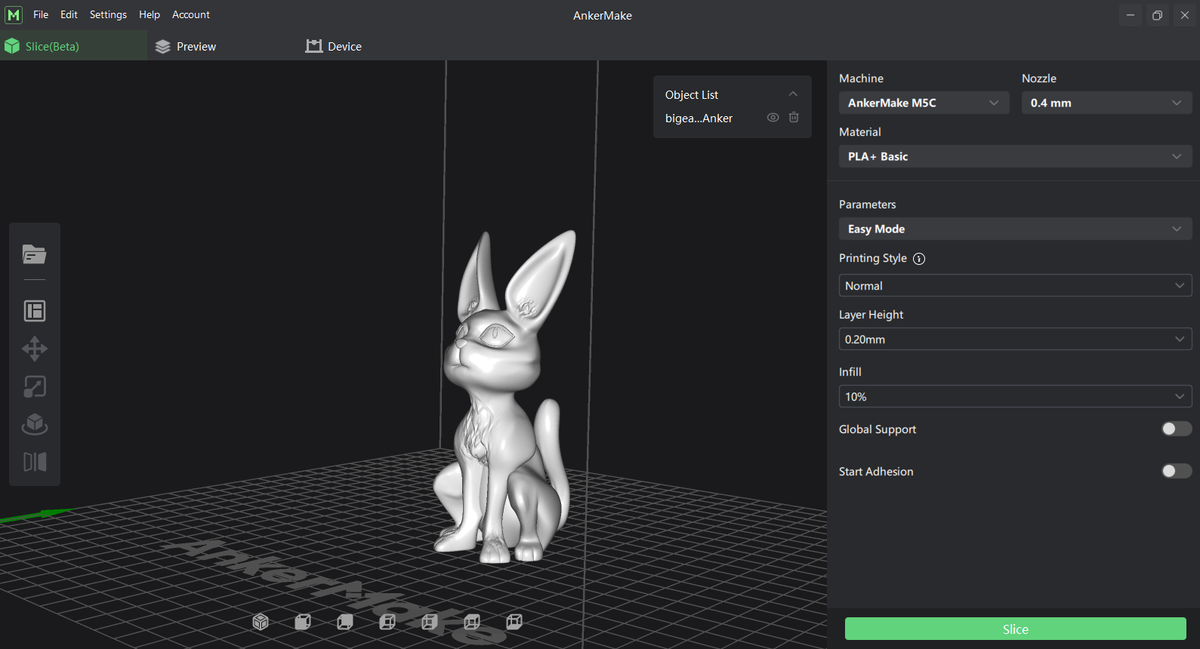
AnkerMake offers its own customized slicer, which has undergone significant enhancements since the launch of the M5. While I typically lean away from proprietary slicers, I’m inclined to make an exception for this one. Unlike some slicers with Easy or Basic modes, AnkerMake’s slicer excels due to its user-friendly design. The workflow progresses smoothly from top to bottom, involving selections for Printer, Material, Printing Style (speed), Layer Height, and more. The options are limited to Yes/No or a maximum of three choices.
Upon clicking “Slice,” the file is sent to the Preview Menu, which mirrors the screen you’d encounter in Expert Mode. Here, you can double-check the slicing results. You have the option to click “Export” to save the file – perhaps to that elusive USB-C flash drive – or directly click “Print” to transmit it to a printer. Notably, the slicer still follows the process of creating an AI image, a step primarily relevant to the M5 model and its camera. This aspect could potentially be misleading for M5C owners or any future upgrades.
Printing on the AnkerMake M5C
The AnkerMake M5C boasts a maximum speed of 500mm/s, although opting for 250mm/s delivers superior print quality – a rather commendable outcome. Through extensive speed testing, I found that while 500mm/s might be a bit ambitious, there were never any quality concerns arising from vibrations.
I conducted my test prints utilizing the AnkerMake app, and in the absence of provided filament, I utilized EIBOS Matte-PLA samples. It’s important to note that procuring filament before acquiring this machine is highly recommended. We have compiled a guide featuring our preferred filaments for 3D printing, available here.
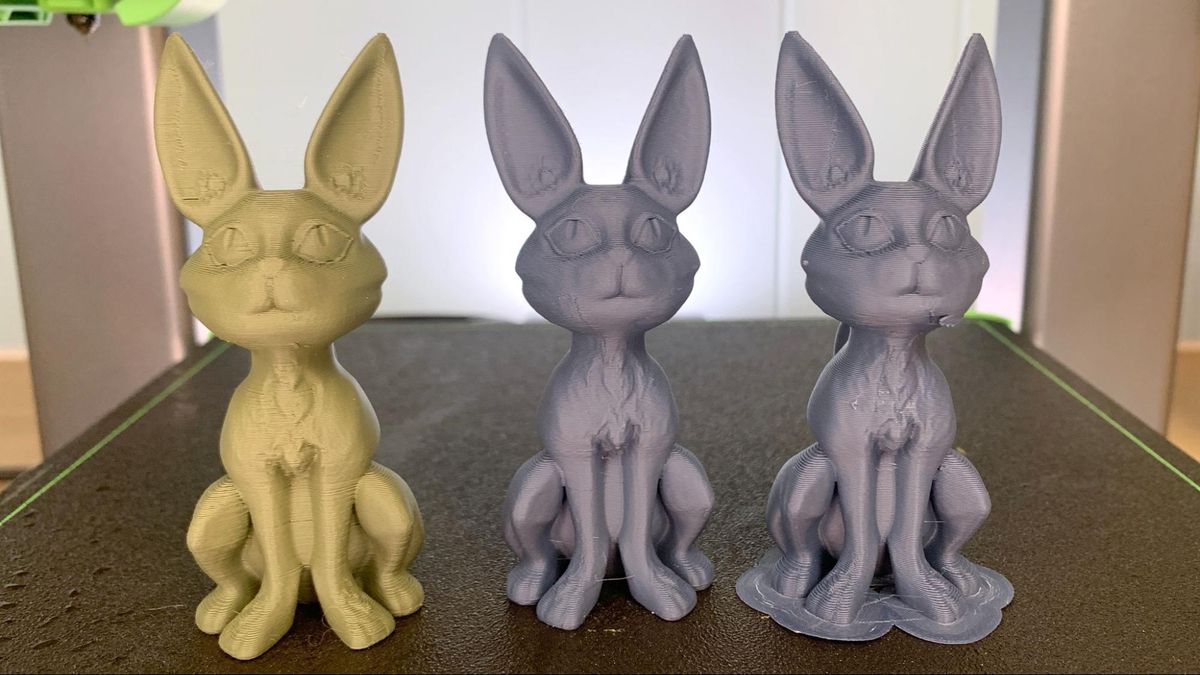
The gray cat/bunny on the right was printed directly from the app and defaulted to “fast printing.” It exhibits a somewhat coarse appearance, with the chin being adversely affected due to insufficient support. The one in the middle was sliced by me, maintaining the default “normal” speeds while enhancing the wall count to three. Additionally, I omitted the brim, resulting in an improved print quality.
The khaki bunny on the left underwent the same settings but was directed to the AnkerMake M5. The printed object displays slightly reduced quality compared to the sliced M5C print, featuring somewhat rugged layers. The print required 30 minutes when produced from the app while using 3 walls at 250mm/s took 50 minutes and 21 seconds.
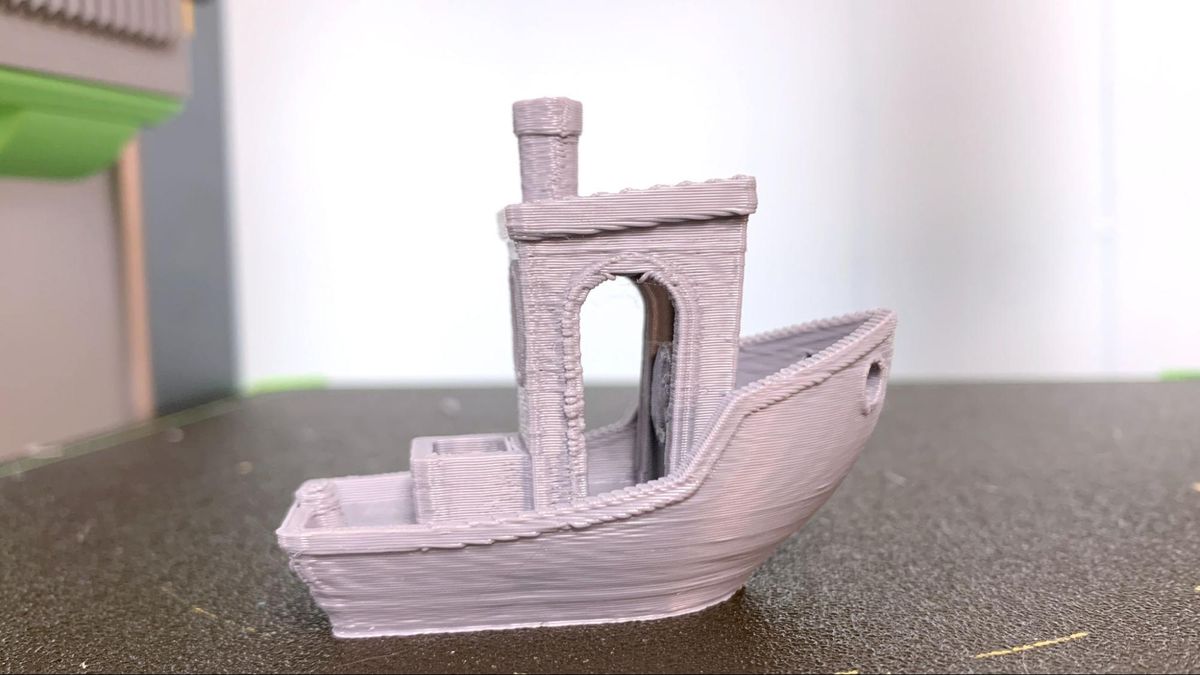
I successfully printed a remarkably fast Benchy in just 20 minutes and 4 seconds, adhering to the Speed Boat Rules (2 walls, 3 top and bottom layers, 10% grid infill, a layer height of 0.25, and a layer width of 0.5). While the layers exhibit some coarseness, there are no evident ringing or layer shifts. This particular Benchy was produced using standard gray Inland PLA filament.
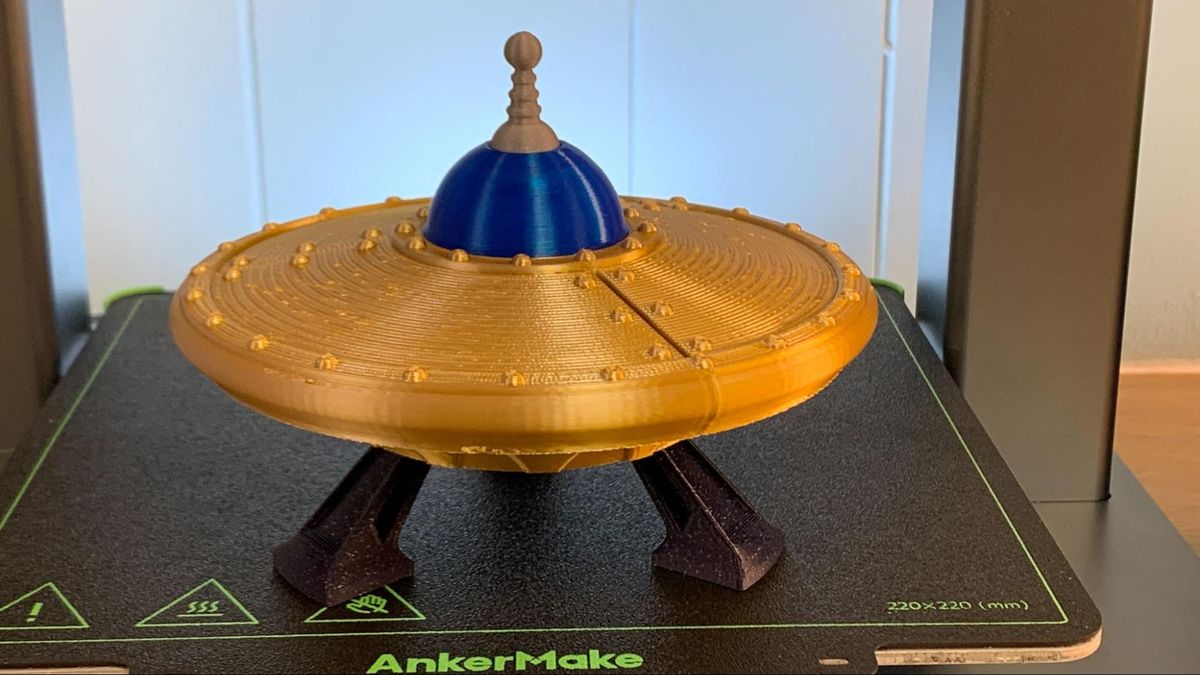
To demonstrate the AnkerMake M5C’s capabilities under more relaxed conditions, I embarked on the production of this Clockspring Cosmic Saucer. Employing Easy Mode, Normal Speed (with a maximum speed of 250mm/s), and a layer height of 0.2mm, I crafted the individual components that subsequently screw together.
The results are strikingly smooth, characterized by intricate detailing and sleek walls. I chose Inland Dual Color Gold/Silver, Policymakers Starlight Jupiter (for the antenna), Galaxy Dark Blue PolyLite PLA (for the landing gear), and Protopasta’s Cobalt Blue Translucent HTPLA (for the glass). The cumulative printing duration amounted to 2 hours, 30 minutes, and 33 seconds.
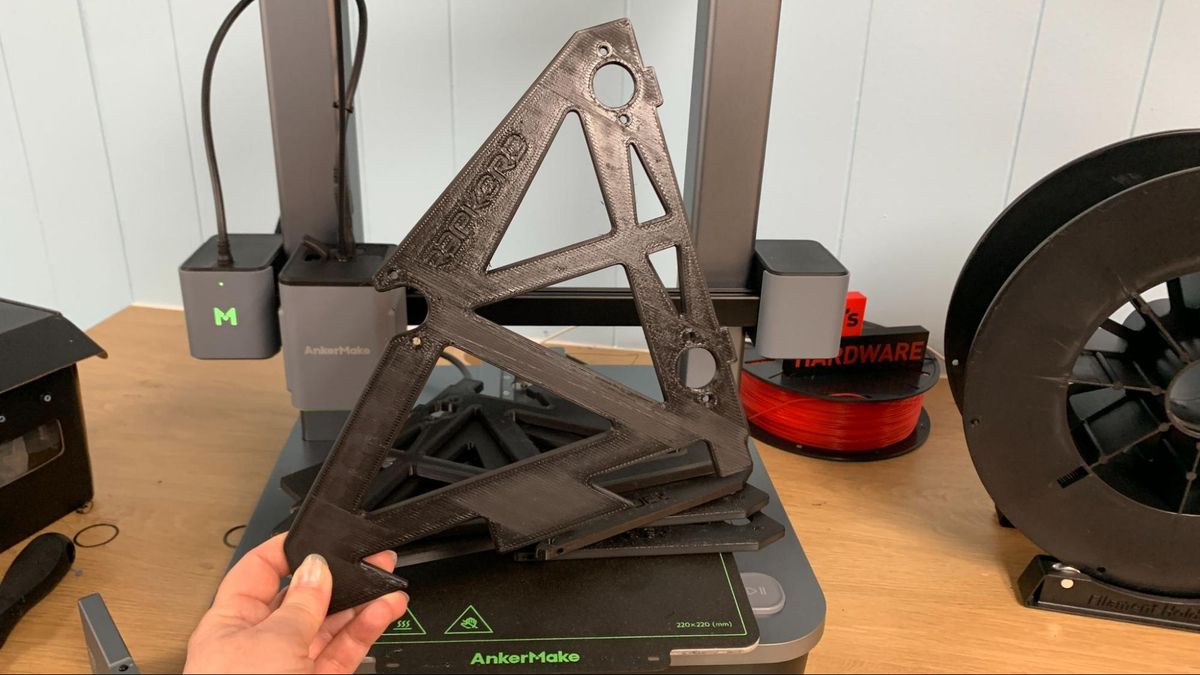
For a utilitarian print, I harnessed the capabilities of the AnkerMake M5C to manufacture PETG brackets meant to support a fresh filament shelf. I adhered to AnkerMake’s default PETG settings, which capped the wall speed at 150mm/s while amplifying the print with 6 walls and a 25% infill. Though the top layer displays some streakiness, the components remain notably robust. This particular print demanded a duration of 2 hours and 59 minutes, using IC3D recycled black PETG material.
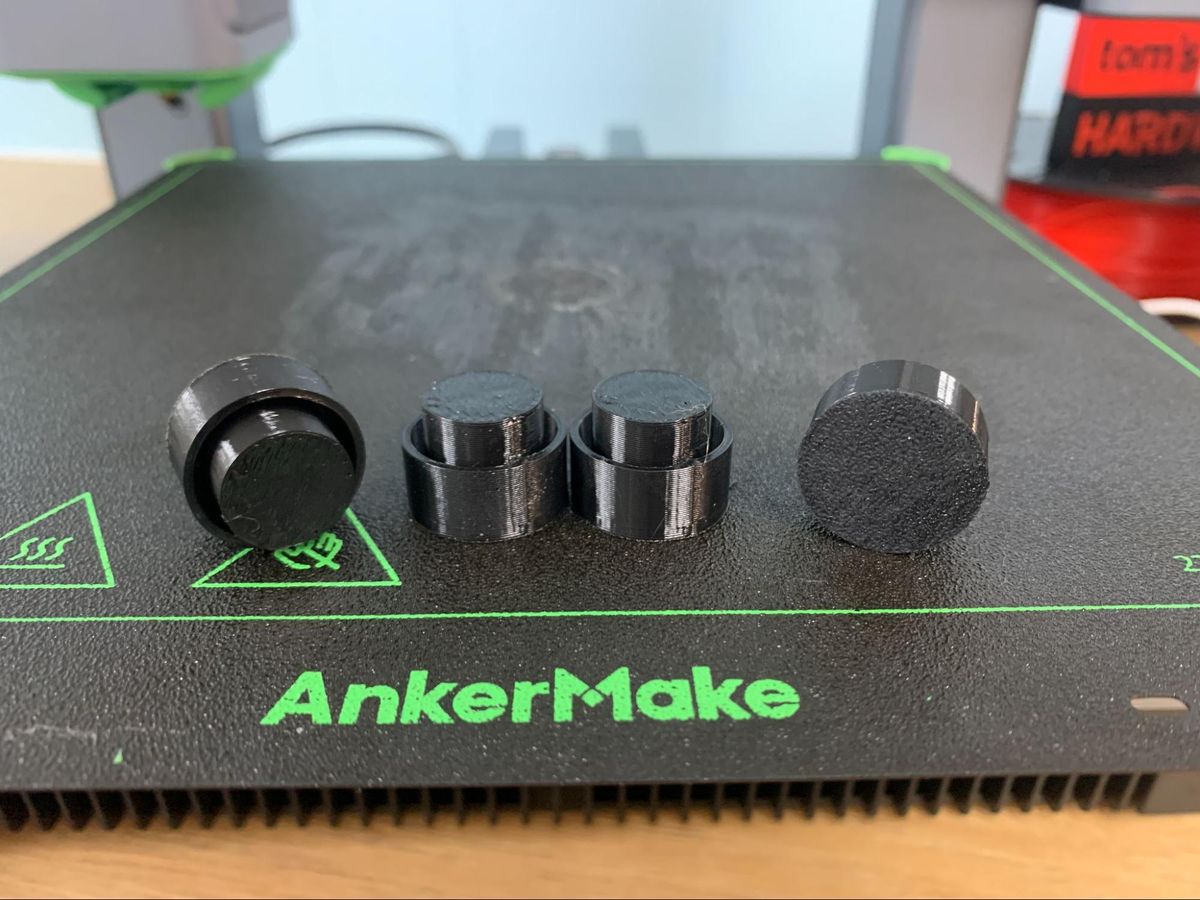
Continuing with practical prints, I undertook the task of crafting TPU caps designed to cap off the ends of the pipes forming my recently constructed RepRack filament shelf. I designed these caps using Tinkercad and subsequently uploaded them to Printables. Employing AnkerMake’s default Easy Mode settings for TPU, each cap was produced in just 10 minutes and 3 seconds. The resulting prints are impressively smooth and swift, devoid of any stringing issues, and were achieved using Inland Black TPU filament.
Bottom Line
The AnkerMake M5C presents itself as a swift printer with certain features, or their absence, that might require some adjustment. The initial lack of a screen did raise concerns for me, but if you’re consistently connected to the internet, having a phone nearby isn’t a major inconvenience. Alternatively, you can address the screen issue by keeping an old mobile device with the app installed within close proximity to the printer.
In the realm of quick bed slingers, the M5C holds its ground commendably, showcasing its competitiveness in the ongoing race for rapid 3D printing. With a price tag of $399 and the prospect of an optional six-spool “color engine” slated for release by year’s end, the AnkerMake M5C is a contender deserving of attention.
Its straightforward usability positions it as an excellent recommendation for newcomers and creators who prioritize the act of making. The printer’s minimal need for adjustments might make it less appealing for those who relish modifying their machines extensively; they might consider exploring the construction of a Voron instead.
For those intrigued by swifter printers at even higher price points, the blazing-fast $699 Bambu Lab P1S and the visually captivating FLSun V400 Delta are options to consider, although the latter comes with a steep $849 price tag.
For individuals seeking speed, ease, and a screen within this price range, a worthwhile alternative is the similarly priced Sovol SV07, which runs vanilla Klipper and retails for $339. On a tighter budget, the Klippered Elegoo Neptune 4 offers an option at $259. Nonetheless, at $399, the AnkerMake M5C strikes a solid balance between features and cost. Just be sure to have that phone readily accessible.

